SQL Server Built-in Functionality
There are two options for configuring log shipping using the updated feature in SQL Server 2005.
You can either use SQL Server Management Studio or stored procedures. Using the stored procedures
to configure log shipping was not possible in SQL Server 2000. Log shipping is included as
a feature in the following editions of SQL Server 2005: Developer Edition, Enterprise Edition, Standard
Edition, and Workgroup Edition. In SQL Server 2000, log shipping was only available in the
Developer and Enterprise
Like SQL Server 2000, SQL Server 2005 provides a way to monitor the status of your log shipping
pair by configuring a monitor server during the configuration of log shipping. The section “Monitoring
Log Shipping” later in this chapter shows you how to see the status of log shipping. The only reason
I am mentioning it here is that where you place the monitor is a consideration for installation. It
can be placed on any available SQL Server 2005 instance that supports the log shipping feature. I do
not recommend placing it on your primary, as that would be a single point of failure. I always recommend
putting the log shipping monitor functionality on a completely separate server that is not the
primary or the secondary. The monitor is optional; so if you choose not to deploy one, there are other
ways of monitoring the status of log shipping. One bonus of a monitor that exists on another SQL
Server instance is that multiple log shipping configurations can share one log shipping monitor.
SQL Server Management Studio
The following steps walk you through the process of configuring log shipping via SQL Server Management Studio:
Step 1. Start SQL Server Management Studio. Expand the Databases folder, select the database that will serve as the primary, right-click the database, select Tasks, then Ship Transaction Logs
as shown in Figure 1. You can also select Properties, and then when the properties of
the database are displayed, select the Transaction Log Shipping option. With either method,


Step 3. Click Backup Settings. The Transaction Log Backup Settings dialog will be displayed. In the
Network Path to Backup Folder text box, enter the share name you created on the primary
computer. If you are planning on crossing domains that are not trusted for log shipping, you
will have to use the IP address instead of the server name in the share (e.g., \\172.22.10.1\
backups). If the folder is located on the same server as the SQL Server instance containing
the primary database, enter the path to the local backup path share. This is not necessary if
you are generating backups to another server or share (as I noted previously in the considerations
for log shipping). By default, the log shipping functionality will create a backup job
on the primary with the name LSBackup_dbname, where dbname is the name of the primary
database. If you wish to change the name of the backup job, change Job Name, as
shown in Figure3 
The backup job defaults to a frequency of 15 minutes. If you want to
change how often the backup job is executed, click Schedule. You will see a dialog similar
to the one in Figure 4.

Step 4. Click Add to begin the process of adding a secondary. You will see the Secondary Database
Settings dialog as shown in Figure 6
Click Connect. You will be prompted to connect to
the secondary database instance as shown in Figure 7.

Make sure that you enter the
proper name or IP address of the SQL Server 2005 instance that will contain the warm
standby database and click Connect.
Step 5. Select the Initialize Secondary Database tab of the Secondary Database Settings dialog. By
default, the name of the database that will be used on the secondary SQL Server instance is
the same as the one on the primary. You have three options:
• Use the configuration tool to create a full backup of the primary database as shown
in Figure 8
You cannot control the name of the backup that is generated; it will
be dbname.bak, and will be placed in the directory or share you configured in step 3.
If you want to restore the database to a different path on the secondary, click Restore
Options, and enter the new paths for your data and log files in the dialog as shown in
Figure 9

. The paths you enter should be local to the secondary server, such as
C:\SQL Data. If you want to restore the database to a different name, enter a new
name in the Secondary Database drop-down/entry box.
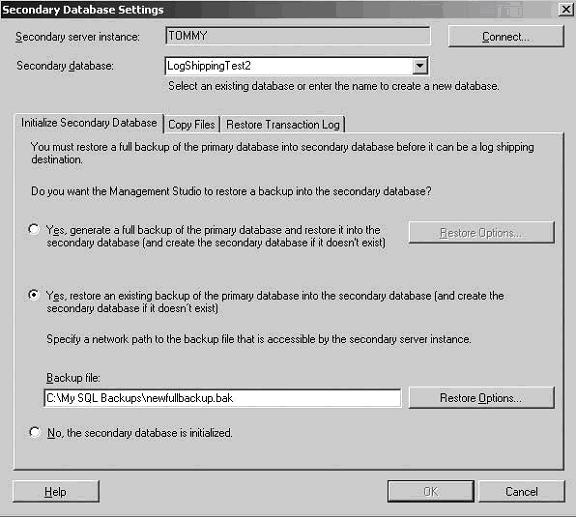
figure 10
• Use an existing backup file and have the process restore it on the secondary server. Anexample is shown in Figure 10.
As with the previous option, you can choose to customize
where you will place the data and log files on the secondary. Click Restore Options.
Note Both options for initializing your standby database are controlled by the settings you will configure on the
Restore Transaction Log tab for restoring your transaction log files. For more information, see step 7.
• Back up, copy, and restore the database on the secondary yourself with either

figure 11
NORECOVERY or STANDBY. Select No, the Secondary Database Is Initialized, as shown inFigure 11
. You must select the database you restored in the Secondary Database
drop-down.
Step 6. Select the Copy Files tab. Enter the share name you created on the secondary to receive
the backup files. The log shipping functionality can
also delete the files copied to the secondary. The default is three days (72 hours). The
default job created on the secondary (so the copy is a pull, not a push) is named
LSCopy_primary_dbname where primary is the name of the primary database instance
and dbname is the name of the database. To modify how often the copy job is run, click
Schedule. You will see a dialog similar to the one displayed in Figure 12.

Click OK

Step 7. Select the Restore Transaction Log tab. The main option you will select here is to tell the
restore job to apply the transaction logs using either WITH NORECOVERY or WITH STANDBY. If
you previously selected the option to initialize the database, whatever you selected for the
restore state will also be used for the restoration of the full database backup. An example is
shown in Figure 14

. The default job created on the secondary (the copy is a pull, not a
push) is named LSRestore_primary_dbname where primary is the name of the primary
database instance and dbname is the name of the database. To modify how often the restore
job is run, click Schedule. You will see a dialog similar to the one displayed in Figure 15.

Click OK when finished modifying the schedule.
Note If you select the WITH STANDBY option for your restore, and the user configuring log shipping does

figure 16
not have the proper rights for both SQL Server instances, you should see a message similar to the one inFigure 16.
shipping screen. To configure a monitor, select the option Use a Monitor Server Instance.
This is optional; however, as noted previously, if you do not create the monitor now, you
cannot add it later. The display will be similar to the one in Figure 17.

If you create a
monitor, click Settings. Otherwise, skip to step 10.
Step 9. On the Log Shipping Monitor Settings dialog shown in Figure 18,
click Connect.

You will
be prompted to connect to the SQL Server instance that will contain the monitor. An example
is shown in Figure 19.

Click Connect. You should now see the dialog updated, as
shown in Figure 20.

Select how the primary and secondary instances will connect to the
monitor. On the monitor, the alert job will be configured with the name LSAlert_InsName
by default, where InsName is the name of your SQL Server instance. You can change this if
you wish. Click OK to close the Log Shipping Monitor Settings dialog.
Step 10. Click OK to start configuring log shipping as shown in the dialog in Figure 21.

11. Once log shipping is successfully configured, you will see a dialog similar to the one in
Figure 22. Click Close.

Figure 22. Successful completed log shipping configuration
Transact-SQL
As with most features in SQL Server 2005, you can set things up either via SQL Server Management
Studio or through Transact-SQL. To configure log shipping, you will use the stored procedures
Stored Procedure Server
sp_add_log_shipping_primary_database Primary
sp_add_schedule Primary
sp_add_log_shipping_primary_secondary Primary
sp_add_log_shipping_alert_job Monitor (optional)
sp_add_log_shipping_secondary_primary Secondary
sp_add_jobschedule Secondary
sp_add_log_shipping_secondary_database Secondary
Note If you look in both the master and msdb databases, you may see other system stored procedures that
relate to log shipping (e.g., sys.sp_processlogshippingmonitorhistory). These procedures are used by log
shipping and are called within some of the stored procedures used for installing, running, and maintaining log
shipping. These are not documented since you would never actually use them yourself.
The easiest way to see how log shipping is scripted is to do it through SQL Server Management
Studio once and then generate a script. The stored procedures listed earlier .
in SQL Server 2005 Books Online, and going through them here does not make a lot of sense.
Custom Log Shipping
As noted earlier, you can also code your own log shipping process. I have written scripts for you to
use or use as an example; they can be found on the Apress site in the Source Code/Download section.
The log shipping process I wrote is a tad different than but similar to Microsoft’s built-in
feature. One of the main problems I have with canned features such as the built-in implementation
in SQL Server 2005 is that it requires you to change any maintenance you may have in place already.
You cannot just hook into an existing transaction log backup that is already being done. The scripts
on the Apress site allow you to use your existing transaction log backup job. You also do not have as
much control over the copy process since it is pretty much a black box. My scripts are a combination
of SQL Server stored procedures and VBScript that is used to perform the copying.
Postconfiguration Tasks
After you configure log shipping, you will need to ensure that all objects that live outside of the primary
database are also configured on your secondary (or secondaries if you are log shipping to more
than one server). If you do not do this, your database may not function properly if you ever need to
bring it online. The easiest way to do most tasks is to create scripts, modify them if necessary, and
apply them to the secondary instance.
Once you select the object to script, you will have three options: script to a query window,
script to a file, or script to the clipboard. The easiest option is to script the object directly to a file,
but if you are trying to create a master script to create all objects, you may want to script it to the
clipboard or to a query window and manipulate it that way.
If an object cannot be scripted from Management Studio, such as an SSIS package, you will
need to find what the best method is for getting that object over to the secondary. The easiest way is
always to get it into some sort of file in Windows and then copy it to the other server and apply it.
Administering Log Shipping
Once you get log shipping set up, you will need to administer and maintain it. There are two methods
for hiding the server name change in a log shipping role change: Network Load Balancing and
configuring a DNS alias. Since these techniques apply to more than just log shipping, they are covered.
configured on the same hardware as a failover cluster; so if any of the instances are nodes of a
failover cluster, you cannot use this method to abstract the instance name change.
Monitoring Log Shipping
One major change from SQL Server 2000 Enterprise Edition is the way you monitor log shipping.
SQL Server 2000 shipped with a Log Shipping Monitor that when installed showed you in an interface
the status of your log shipped pair. SQL Server 2005 removes the graphic interface, but you
can query tables or use stored procedures.
Job Status
Arguably the simplest way to first check the status of log shipping for most administrators will be
to see the status of the SQL Server Agent jobs involved with log shipping. Those will tell you if the
configured jobs are actually running successfully or are failing.
If you do not want to use any of the available stored procedures to monitor your log shipping configuration,
you can query the system tables (log shipping–specific tables, tables relating to jobs, etc.)
that contain information about log shipping directly. All of the tables are located in msdb. The tables
specific to log shipping are the following:
• msdb.dbo.log_shipping_monitor_alert: This table contains only one column, which is the
SQL Server Agent job ID of the log shipping alert job.
• msdb.dbo.log_shipping_monitor_error_detail: This table contains the specific SQL Server
Agent job errors encountered during log shipping.
• msdb.dbo.log_shipping_monitor_history_detail: This table contains the history details for
the SQL Server Agent jobs associated with the log shipping plans.
• msdb.dbo.log_shipping_monitor_primary: This table contains configuration information
about the primary database, and there is only one record per primary.
• msdb.dbo.log_shipping_monitor_secondary: Similar to the previous table, this contains one
record per secondary and has information about the configuration of the secondary.
• msdb.dbo.log_shipping_primaries: This table contains the monitor information for each log
shipping plan.
• msdb.dbo.log_shipping_primary_databases: This table contains one record per primary, and
has information about the primary database.
• msdb.dbo.log_shipping_primary_secondaries: This table contains one record per primary,
and has information about the secondary database.
• msdb.dbo.log_shipping_secondaries: This table has the mappings from the log shipping
plan to the secondary instance and database.
• msdb.dbo.log_shipping_secondary: This table contains information about the secondary and
its status. There is one record per database.
• msdb.dbo.log_shipping_secondary_databases: This table contains configuration information
about the secondary database. There is one record per configuration
No comments:
Post a Comment